If you cook most of your meals at home, then you probably already know about parsley and the importance of it. Parsley will go best with tomato sauces, poultry dishes, seafood, egg dishes, potatoes, and soups. Not only that but it has also been proven that parsley has a lot of health benefits for you. It is also easy to grow since it is a herb and does not require a lot of space.
Can you grow Parsley in Aerogarden?
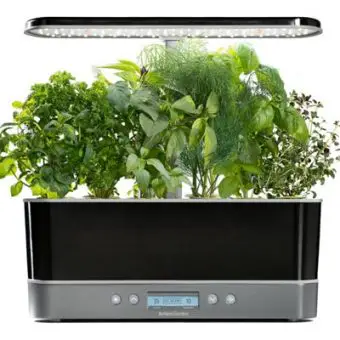
Yes. You can grow Parsley in your Aerogarden all year long. In fact, Parsley is really easy to grow, since it is a herb and thus not require much space or care at all. If you want to grow this herb in your smart gardening system, you are definitely going to enjoy the process. It can be grown even in the smallest Aerogarden model – Herbie.
How to plant Parsley in your Aerogarden?
The good news is that you can buy parsley seed pods on the market, meaning that you will have 0 to none work with it. You can also make your own pods, or reuse the old ones and just buy the grow sponges and parsley seeds. If you will make your own pods by reusing old seed pods, then you just have to put around 3-4 seeds in every grow sponge and then put the new grow sponger with your parsley seeds inside an old grow basket. Finish it off with a brand new grow label and cover the seed pods that are ready to be installed.
I would recommend that you put the grow domes (little plastic cups that come on the top of every seed pod) after you have already installed the seed pods. Just push the seed pods in. Do not use much force. The seed pods are installed once you hear a small click and the same goes for the grow domes. Again make sure not to use too much force since it can break your plastic parts.
How to take care of Aerogarden Parsley?
Parsley is a Herb plant. This means that the amount of care that you will have to provide is close to zero. The most important thing to do is making sure that your smart garden has enough water and liquid nutrients. Another thing to watch out for is bacteria and rotten parts. If your Parsley is showing signs of them, just cut the bad parts away and your plant is as good as new. The indicators of your herbs going bad are rotten or brown leaves.
How to Prune AeroGarden parsley?
Single leaf cut
If you look at your Parsley, out of every stem there should be 3 leaves growing (each one on its smaller stem coming out of the main stem). If you just want 1 leaf, cut it where it comes from the main stem. Make sure not to damage the other two leaves with their stems, because they are very delicate and require a gentle touch.
Three leaf cut
If you need all three leaves that are growing from a single stem or even more, then you should follow the stem and cut it right above the grow label, or if you do not have the label just cut it about half an inch above the grow basket.
IMPORTANT:
If you just need all three leaves of the plant make sure to cut it as described above. If you cut all three leaves just like you would cut Parsley if you only wanted one leaf, the stem will not recover and will just stay as is. You do not want that because the stem will just take up space and food away from the other stems that still have growing leaves on them.
How to harvest AeroGarden Parsley?
Harvesting parsley is basically the same as pruning it, with the exception that you use the parts that you have just cut off and added them to your food. The whole process is really simple and for those of you that did not read the whole article, the process is described above this paragraph.
How long can you expect your Parsley to last in your Aerogarden?
Parsley, amongst other herbs, should last about 4 months or so the manufacturer says. In my case, I have seen many herbs last up to 6 months and even more if provided with proper care and of course enough water and nutrients in your system.
How to replant Aerogarden Parsley to pots or outside?
Transplanting Parsley from Aerogarden to pots
STEP 1: Take your Parsley seed pods out of your smart garden
The first step will require the most cautious of them all. Like I have mentioned before, parsley, like any other herb, is quite delicate and therefore requires a gentle touch. Try taking it out by grabbing the top of the grow basket and pulling it out. If it won’t go easily, it’s probably because the roots of it have mixed and curled up with roots of your other plants. Try to wiggle it around a bit, and if this won’t work you can use your scissors or gardening shears to cut the excess roots away.
Next, you will have to remove the grow basket from the plant itself. Try getting the plant out with just gently pulling it. You can also cut away the excess roots to make the process easier but make sure not to cut off too much of them. Saving an old grow basked can save you some money in your future gardening projects. You can also cut the grow basket off, but I would recommend that you try your best to save it for later.
STEP 2: Prepare your pots
Get some planting pots or whatever other containers that you want to grow parsley in. I would recommend that you use regular pots with holes on the bottom. Fill them up with soil, but only halfway. If you can, try using pre-fertilized soil.
STEP 3: Plant your parsley
Put the parsley into the pots and fill the remaining space with soil, but try leaving at least half an inch of your pot free on the top. This way you will prevent making a mess when you are watering it.
You are now done with transplanting your Parsley.
IMPORTANT:
Keep in mind that any herbs that you grow in pots indoors will need sunlight. The best place to put the pots is a window shelf. Also, make sure not to let your plant dry out.
Transplanting your Parsley outside:
The process of transplanting your Parsley outside is pretty much the same as it is with the pots. Just try to imagine a hole in the ground instead of the pot. There are however a few factors to take into consideration when you are planting Parsley outside.
Make sure that there is no more danger of frost because it will ruin your plant. Next, you also have to make sure that the soil in which you will plant your parsley is wet. If your soil is dry, just take out a water hose and water if for a few seconds. The next thing to take into consideration is fertilizing the soil if you are not using the pre-fertilized one. If you have compost at home, you can use it as a natural fertilizer. Be careful not to over-fertilize your soil, because it can also be bad for the plant itself.
When you have transplanted any kind of plants outside, it would be smart to water them on a daily basis.
Benefits of Parsley
Like any other herb, Parsley has a lot of health benefits for you. One of the greatest benefits of it is that it helps to prevent cancer. Parsley is rich with myricetin, in fact, it has one of the highest percentages of myricetin per 100 grams out there. Myricetin has been known to prevent skin cancer. Keep in mind that you do not have to change your cooking to add parsley to it. Want to have a lasagna? Add some parsley. Want to eat potatoes? Add some parsley. Want to enjoy a big juicy steak? Add some parsley.
The second great health benefit that parsley has is that it can protect you against diabetes. Protecting from diabetes also comes from a high percentage of Myreciten, which has already been used in the prevention and treatment of diabetes. It will lower the sugar levels in your blood and also lower the resistance towards insulin.
Another type of disease that can be improved by parsley is bone diseases. Vitamin K is a crucial factor in making your bones stronger and therefore you can lower the risk of bone fractures with a bigger intake of it. If you eat at least 10 springs of parsley every day, you lower the possibility of bone fracture by up to 22 percent. So next time you are making pesto, make sure to add some fresh parsley that you have just harvested from your indoor garden or start making some delicious smoothies every day and I guarantee you that your health and overall feeling will improve in oh so many ways.
What to do after the last harvest or replanting?
Clean your AeroGarden! I can not stress this enough. You should always keep your smart garden clean. If you do not clean it, you can expect much less success in your future indoor gardening projects. Cleaning and sanitizing your aerogarden will prevent the spreading of bacteria and root pathogens.
If you do not know how to clean your aerogarden, you can read the step by step process here.
Conclusion:
You can grow Parsley indoors in your Aerogarden and since it has so many great health benefits I highly suggest that you do and in this way add more parsley to your diet. You can expect it growing for about 6 months if provided with proper care. You can also transplant it in pots or outside if you want to grow something else in your Aerogarden, just make sure to clean it first! When you harvest your Parsley, never leave just the stem, since the leaves won’t regrow. If you need all three leaves just cut the main stem on the bottom.
Thank you for reading, and if you have any questions or experiences to share, please feel free to post them in the comment section below. Have a nice day!