
Before you buy your Aerogarden seed pods, you should do at least a little research on the subject. Not all plants are simple to take care of, and some plants do require a lot more space than the others and are therefore not suitable for any Aerogarden model. In this article, we will cover all the topics on the matter and in that way provide you with enough information to make a smart decision before you buy your seed pods.
What you should know before buying your Aerogarden seed pod kit:
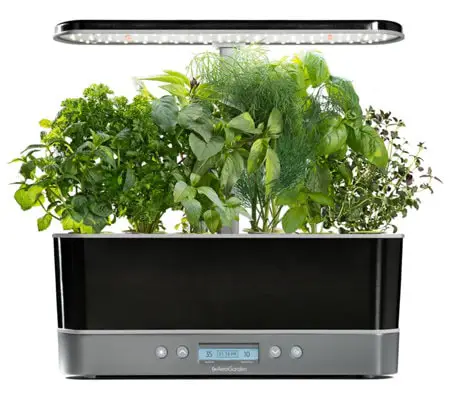
Herbs
Where to get them:
You can buy herb seed pod kits online, or you can also make your own seed pods. You can check the latest price of the herb seed pod kit on amazon.
For those of you that have decided to make your own seed pods, I would recommend that you reuse the plastic parts from your old seed pod kits. Once you have your grow baskets and grow domes, all you need are the grow labels and grow sponges, which you can buy online. Just put 3 to 4 seeds in every grow sponge and insert them into the grow baskets. After that you just have to finish it off with a grow label and the grow dome and you are ready to go.
Difficulty:
Herbs are the easiest to grow indoors with your smart garden. They do not require a lot of space or attention. You can even grow herbs in the smallest Aerogarden model on the market-Herbie. To grow fresh herbs indoors, you will just have to make sure to check the water levels and also the amount of nutrients in your water bowl. Do not worry, since the system is so advanced, that it will inform you when to add either water or nutrients.
Care:
Like mentioned above, the care for your herbs is a really simple task. If you keep the water and nutrient levels from falling low, you should be ready to go. By herbs it is vital to harvest them regular when they are ready to be harvested. In some cases harvesting herbs will simulate their growth. For example- if you harvest a single leaf of basil, that same leaf will be replaced by two new ones. You can also try transplanting your herbs to the pots once they are big and strong enough.
Lifespan:
The manufacturer is stating on their site, that herb seed pod kits should last 4 months, but in my experience that is a really conservative number. The longest that I have seen herb seed pod kits last was about 7 months and even then I replanted them in pots and kept growing them on the window shelf. There is no better way to add flavor to your refreshing drinks in the summer than putting some fresh mint or sweet basil in them.
So to sum it up, you should provide all your plants with proper care in order to keep them alive and kicking for as long as possible. Once you plant them, your herbs should take about 4 weeks in total to be ready for their first harvest. Try not to harvest them before, because they are in a very sensual period, where they should just be left alone to grow.
Benefits:
The biggest benefits of growing herbs indoors are; fresh air, the ability to spice your home cooked meals with fresh, just harvested herbs, in some cases growing herbs will also give a nice scent to your home and of course the endless health benefits that come with herbs.
If you like Italian foods such as lasagna, pasta, etc. then you must know that there is no Italian meal without herbs as spices, especially fresh basil and rosemary. Those two herbs will definitely give your meal a fine Mediterranean touch that is vital when it comes to the taste of your end result.
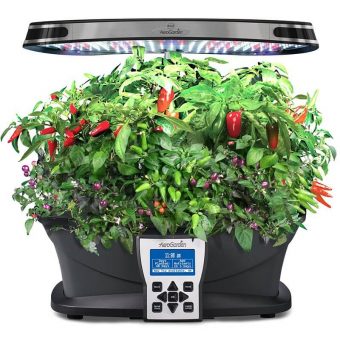
Vegetables
Where to get them:
Some of the vegetables you can buy in form of seed pods online, while for some you will have to make your own pods. Do not worry, the process is really simple, but if you want to grow a bigger vegetable, you are eventually going to have to transplant it outside.
When you are making your own pods you have to look at the size of the seeds. If the seeds are bigger I would not recommend putting more than 3 in one grow sponge, but for smaller ones it is okay to insert as much as 5 seeds in a single grow sponge. Vegetables usually have bigger seeds that lets say herbs.
Difficulty:
When it comes to growing fresh veggies indoors there will be a bit more work involved than there is by growing just herbs. In some cases you will also have to pollinate the plant yourself, since there are no natural pollination methods available (wind and bees).
You can pollinate your plants in 3 different ways. First one is like creating your own soft wind that will do the work for you. Just point a fan towards the plant and set it to the lowest setting. You have to do that as soon as your plant starts to blossom. If you set the settings on your fan to middle or high you might ending up failing the process, so make sure to have it on the lowest setting.
The second way is by gently shaking the plant. I am not particularly a fan of this method because you can do some damage to your plant and will also only work if the male flowers are above the female ones. If you truly want to grow as much veggies as possible, then you will have to choose the third option that requires the most time, but is in my opinion totally worth the work.
So the third option is that you pollinate the plant yourself with a cotton swab. First you will have to find all the male blossoms on your plant, gently touch or swipe them with a cotton swab and then, with the same part, gently touch the female blossoms to transport the pollen over. If you go with the third method, please make sure to use as much caution as possible, other vise you might do damage to the plant itself and may end up with a poor result when it comes to harvesting.
Care:
Like I have mentioned above, vegetables do require a lot more work than herbs or flowers. Amongst other stuff, you will have to pollinate the plant yourself. If you didn’t read the whole article, then scroll just a bit up and learn how to pollinate your plants yourself with 3 different methods.
Vegetable plants, unlike flowers or herbs are much more attractive to insects. If you do not keep an eye out for them, then they might seriously damage your plant and keep you from seeing success when it’s time to harvest them and taste your results.
Another danger that comes with growing veggies indoors or outdoors are bacteria and plant diseases. So what can you do to prevent them or to save your plants if you already got them? The best prevention out there is definitely keeping things clean. If you clean and sanitize your Aerogarden, every time after you change out your seed pods, you can lower the risk of bacteria and root pathogens by as much as 90%. Even though they are just plants, they do prefer a clean and sanitized environment to grow in.
It is not enough to just clean your smart garden with water. You should also sanitize it with either white vinegar or chlorine bleach and turn on the pump so your sanitizer reaches all of the areas that you would not reach just by pouring water inside and out. Do not put your Aerogarden into a dishwasher. Not even only the bowl, because it will get damaged by the hot water in your dishwasher. I have made an article about this already, but just to make sure I will point this out again: Aerogarden is NOT dishwasher safe!
Another thing to keep an eye out for is also the bacteria that spreads on the leaves of your plant. If you see any leaves turning brown-ish, you should cut them off right away to prevent any further spreading. I suggest that you check in on your plants daily or at least every second day. This way you will be able to prevent any damage and still be harvesting nice, juicy vegetables when it comes to harvesting time.
Lifespan:
The manufacturer is stating on their website that you should expect your vegetable plants to gro for at least 6 months, but I have found that to be a pretty pessimistic number. The best result that I have had with my cherry tomatoes indoors with my smart garden was 37 days in total! I had to clean my Aerogarden while the tomato plants were still in the slots! But keep in mind that all sorts of vegetables take much longer to be harvest ready.
While your herbs will be ready to harvest in under 1 month, your vegetable plants will take as much as 2 months to produce vegetables that have ripen and are ready for harvest. After all, with herbs you are harvesting just leaves or stems unlike for example tomato plant which has to grow fruit on it.
Benefits:
I have mentioned this fact many times before and I will do it again: Fresh is always better when it comes to cooking! Whichever ingredient it comes to, nothing can replace the freshness that comes with home grown food. So next time you are cooking something, let’s say you are just making a tomato salad. Try making two of them. One with store bought tomatoes and another one with the fresh tomatoes that you have been growing indoors. I bet that you will really taste the difference. Did you know that the vegetables that you buy in supermarkets are harvested while they are not quite ripe yet? They ripen while they are being transported in boxes, because if they would harvest them when they are just right, they would rot in the time that it takes from them to get from the fields abroad to your house.
Another great feature that comes with growing anything indoors is that your air quality indoors will drastically improve. Plants freshen your air and in this way turn your home into a much more healthy environment. They also moisturize the air themselves, which is just another big plus and another reason why you should start planting things indoors. Trust me when I say that you will feel much better with plants in your life.
There are also a lot of health benefits that come with vegetables. I am sure that there is not one person reading this that doesn’t realize how good vegetables are for you. If you want to lose weight, there is no better way to do it than to still eat tasty but also healthy food. Fresh vegetables are the way to go.
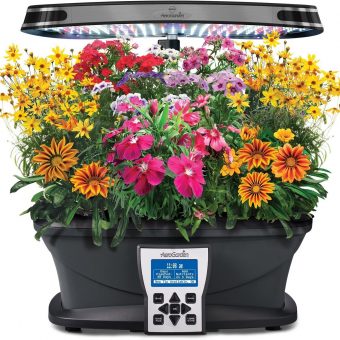
Flowers
Where to get them:
Just like herbs and vegetables, you can also buy flowers in the form of seed pods. The only bad thing is that there are not so many different varieties to choose from. So if you want to grow flowers, you might have to make your own seed pods or reuse old ones and buy the seeds yourself.
Difficulty:
Flowers are more or less like Herbs when it comes to taking care of them. There is not much else to do than to just check the water and nutrient levels in your smart garden. So if you plant flowers, just install the seed pods, do the regular stuff (adding water and nutrients) and wait for the magic to happen.
Care:
Like mentioned above, there is not much that you have to do regarding taking care of your flowers. The only thing that I would like to point out is that sometimes insects can be a big problem, especially if you are not careful and abandon your flowers completely. If you spot any insects on your flowers (they look like black dots mostly) I suggest that you remove them with a brush or with your fingers. Just make sure to be gentle, so you don’t do any damage to your flowers.. keep in mind that they are very delicate, like herbs.
Lifespan:
Again with the flowers, the lifespan information provided by the manufacturer is far from the numbers that I have seen in my experience. In my opinion this is because they do not want to promise too much and then disappoint you. It is always better to give the customer more than expected rather than less.
So manufacturer says that you should be seeing a maximum of 5 months, but the longest that I have had them for was 7 months. Keep in mind that they did take about a month to start blooming and with that fulfilling their purpose.
Benefits:
While it is true that flowers mostly can not be added to your meals, they do make a really pretty decoration for your home. Having flowers in every home and office is really trending now.
There are a lot of health benefits that come with growing flowers indoors. For once they do freshen up your air. Have you ever been in the mountains? Flowers do have their roll in making the air there so pure and good. Flowers can also improve your mental health with their bright pretty colors. And if you are a guy, just imagine growing a flower indoors, and when the time comes you cut it and give it to a special lady. When you give her the flower, make sure to tell her that you have planted it, taken care of it and harvested it all by yourself.
Some flowers can also be good for other things. Whenever someone asks me what I would recommend that they grow in their Aerogarden indoors, Chamomile is always at least in the top 5.
Important!
After your plants die and/or you have decided to switch them, it would then be a perfect time to clean and sanitize your aerogarden. If you do not clean it, you risk the spreading of bacteria and root pathogens! They can critically impact the plants that you will grow indoors in your smart garden.
How to clean your AeroGarden?
To clean your aerogarden, all you will need is water and a sanitizer. You can either use chlorine bleach or my preferable-distilled white vinegar.
Step 1: Make sure that your AeroGarden is empty and then fill it up with your sanitizer
If you want to go with chlorine bleach, you should mix ¼ of a cup with water and pour it inside the water bowl. If you are using vinegar instead, the right amount is about 5 cups also mixed with water.
Step 2: Turn on the water pump
You should let your pump run for at least 5 minutes, so that your sanitizer will reach all the spots, including the inside parts of your pump. This is really important!
Step 3: Pour the sanitizer out and replace it with water
After your smart garden has been sanitized it is now time to pour water inside and turn on the pump for another 5 minutes or so. This is really important especially for people that are using chlorine bleach as a sanitizer.
Step 4: Turn on the pump for another 5 minutes
This will get the sanitizer cleared out from all the areas.
Step 5: Pour the water out and let your smart garden to dry. I would recommend that you leave it for at least 24 hours, but that is your call.
Reusing AeroGarden seed pods:
If you want to be a nature-friendly person like me, you will definitely want to reuse your seed pods, since they are partly made out of plastic. Keep in mind that only the plastic parts are reusable. You will however have to get new grow sponges, grow labels (they are optional and not vital) and liquid nutrients unless you still have them. Just yesterday I saw that someone was selling them in a pack of 3 liters … how crazy is that?
So how do you do it?
Step 1: Take out your old pods
This might be tricky since your plants grew some roots and may got tangled with eachother. If you want you can use a sharp object to cut them. You are throwing them out anyway.
Step 2: Remove the grow sponges from the grow baskets
Just like in the first stem you can use a sharp object to cut the roots if you have any problems with getting the grow sponge with the plant out of your grow basket. Once you have successfully removed them, I would suggest that you compost them. Both the plant and the grow sponge are 100% organic and will even benefit your compost. Grow sponges are made out of Canadian Peat Moss and absorb the scent from the compost. How great is that?
Step 3: Get new grow sponges and seeds
Once you have them at your home, you just have to insert 3-5 seeds into every grow sponge on the top, depending on the size of the seed itself. If the seeds are bigger, you should put in just 3, but if they are smaller you can go up to 5 seeds per one sponge.
Step 4: Put your new grow sponges into your old grow baskets
Once you have done that, make sure that the grow sponges are sitting tight and then you can install them into your Aerogarden. Make sure that your system has enough water and nutrients!
Reusing your old seed pods is not only nature friendly, but is also going to save you some money and give you the ability to grow anything in your AeroGarden. Make sure to try growing strawberries. I did and it was delicious.
Thank you for reading and have a nice day!